Seacock Replacement

This forum is for comments and the exchange of information relating to Trojan Boats and boating. Please do not post used parts or boats For Sale in this area. For general, non-boating topics please use our "General Discussions" section.

Note: Negative or inflammatory postings will not be tolerated.

Moderators: BeaconMarineBob, Moderator, BeaconMarineDon

User avatar
Christian
Sporadic User
Posts: 129
Joined: Mon Aug 11, 2014 7:48 am
Location: Ottawa Ontario

Seacock Replacement

Post by Christian »

Again a perfect weekend at the marina. I work the whole day Saturday to end the day with a little fire and a JT accompanied by surrounding boaters. All in all just a fantastic time... :P

As mentioned in a previous thread I have started replacing all of the through hulls and seacocks below the water line. I thought I would post the progress and ask a few questions while at it.
First I removed the engine raw water seacocks. One was loose but as it turned out was the most difficult to remove :shock: The backing plywood plates were a joke to remove. All of 10 minutes.
Here is the starboard:
IMGP1970smaller.jpg
IMGP1970smaller.jpg (177.86 KiB) Viewed 7595 times
And the backing plate:
IMGP1973small.jpg
IMGP1973small.jpg (243.62 KiB) Viewed 7595 times
Then for the post side:
IMGP1971Small.jpg
IMGP1971Small.jpg (192.22 KiB) Viewed 7595 times
User avatar
Christian
Sporadic User
Posts: 129
Joined: Mon Aug 11, 2014 7:48 am
Location: Ottawa Ontario

Re: Seacock Replacement

Post by Christian »

And the backing plate:
IMGP1972small.jpg
IMGP1972small.jpg (225.31 KiB) Viewed 7594 times
I then tackled the mysterious plug...
IMGP1947small.jpg
IMGP1947small.jpg (200.02 KiB) Viewed 7594 times
IMGP1943s.jpg
IMGP1943s.jpg (218.85 KiB) Viewed 7594 times
User avatar
Christian
Sporadic User
Posts: 129
Joined: Mon Aug 11, 2014 7:48 am
Location: Ottawa Ontario

Re: Seacock Replacement

Post by Christian »

IMGP1976Small.jpg
IMGP1976Small.jpg (223.49 KiB) Viewed 7594 times
While in there I found this hidden gem. That must have been in the hole originally!
IMGP1978small.jpg
IMGP1978small.jpg (214.82 KiB) Viewed 7594 times
Looks like the speed transducer...
I then went on to an orphan seacock that was not attached to anything. I believe it was originally for the AC unit:
IMGP1975small.jpg
IMGP1975small.jpg (240.22 KiB) Viewed 7594 times
User avatar
Christian
Sporadic User
Posts: 129
Joined: Mon Aug 11, 2014 7:48 am
Location: Ottawa Ontario

Re: Seacock Replacement

Post by Christian »

IMGP1974Small.jpg
IMGP1974Small.jpg (237.55 KiB) Viewed 7593 times
Finally, I hit the raw water for the Genset:
IMGP1983Small.jpg
IMGP1983Small.jpg (225.51 KiB) Viewed 7593 times
IMGP1985Small.jpg
IMGP1985Small.jpg (202.03 KiB) Viewed 7593 times
User avatar
Christian
Sporadic User
Posts: 129
Joined: Mon Aug 11, 2014 7:48 am
Location: Ottawa Ontario

Re: Seacock Replacement

Post by Christian »

I found this yellow plate in the generator room! Does anyone else have this?
IMGP1981.JPG
IMGP1981.JPG (227.24 KiB) Viewed 7592 times
I still have 2 others to remove in the port lazarette. Not sure what they are for yet as I have not looked at it closely.
IMGP1987small.jpg
IMGP1987small.jpg (237.64 KiB) Viewed 7592 times
and a last one that I can't seem to find. It is on the port side 3 feet in front of the V-Dive inlets. It looks like the access is through the aft head floor... Any ideas hot to access this one?
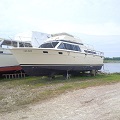
I should mention again that it is in a 1976 Tri-Fly.
User avatar
Christian
Sporadic User
Posts: 129
Joined: Mon Aug 11, 2014 7:48 am
Location: Ottawa Ontario

Re: Seacock Replacement

Post by Christian »

Here is the new hardware for the engine raw water seacocks. You can see the G-11 sheet in the background. Very similar to G-10...
All proper silicon bronze hardware and this big a## hole saw :shock:
IMGP1993Small.jpg
IMGP1993Small.jpg (219.06 KiB) Viewed 7590 times
User avatar
Flyboy
Sporadic User
Posts: 165
Joined: Wed Oct 02, 2013 1:38 pm
Location: St. Charles, MO

Re: Seacock Replacement

Post by Flyboy »

The yellow plate may be a Documentation #. You can check to see if it was documented and the vessel name at
http://www.st.nmfs.noaa.gov/st1/CoastGu ... yName.html
1981 10 meter Trojan International
User avatar
Christian
Sporadic User
Posts: 129
Joined: Mon Aug 11, 2014 7:48 am
Location: Ottawa Ontario

Re: Seacock Replacement

Post by Christian »

Sweet! You were right. I found it. What would be the purpose of this?
User avatar
ready123
Ultimate User
Posts: 1841
Joined: Sat Nov 08, 2008 5:53 pm
Location: Mactier, Ontario Canada
Contact:

Re: Seacock Replacement

Post by ready123 »

Christian wrote:Sweet! You were right. I found it. What would be the purpose of this?
Documented boats must have the number physically attached to the inside of the boat. If the boat is no longer documented it should have been removed.
Michael
Rum is the reason Pirate's have never ruled the world
Done Dreamin'
1987 President 43' Twin Lehman 225SP Turbo
Highfield 310 Ally 15 HP Yamaha 2cycle
1978 F32 Sedan twin 318 Chry SOLD
Safe Cove Marina, Port Charlotte, FL
User avatar
bjanakos
Moderate User
Posts: 498
Joined: Mon Sep 29, 2014 1:00 pm
Location: Richmond, TX.
Contact:

Re: Seacock Replacement

Post by bjanakos »

It does not need to be removed. In fact, the coast guard states that document number be affixed in a way that they can NOT be easily removed. If you ever decide to re-doc your vessel, it may be easier to renew the expired doc than start all over with a new doc.
User avatar
Christian
Sporadic User
Posts: 129
Joined: Mon Aug 11, 2014 7:48 am
Location: Ottawa Ontario

Re: Seacock Replacement

Post by Christian »

Thanks a bunch guys! Much appreciated.

I started cutting the fiberglass plate the big hole saw. Well that was a fail. I was not able to go through the whole thickness before to saw wore out :shock: this stuff is hard as a rock. I don't think it was a bi-metal hole saw. Now I have to figure out another way or get a better one. Will see. I will post a picture of the setup to cut the plates tonight.

Cheers,
Christian
User avatar
bjanakos
Moderate User
Posts: 498
Joined: Mon Sep 29, 2014 1:00 pm
Location: Richmond, TX.
Contact:

Re: Seacock Replacement

Post by bjanakos »

I did mine on a band saw. I made a circle cutting jig for a previous project. It's basically a plywood platform clamped to the table with a 1/4 dowel.

Where you using a drill press with that giant wheel?
User avatar
Christian
Sporadic User
Posts: 129
Joined: Mon Aug 11, 2014 7:48 am
Location: Ottawa Ontario

Re: Seacock Replacement

Post by Christian »

I basically chucked it in my milling machine...
User avatar
yorklyn
Active User
Posts: 1139
Joined: Fri Oct 26, 2007 10:14 pm
Location: Hockessin Delaware

Re: Seacock Replacement

Post by yorklyn »

you can do it with a hole saw and a drill press . I was able to cut all of mine with 2 hole saws. Take your time and dont use too much pressure.
Image
Todd Pote
1987 10 Meter Mid Cabin
Double Pote-N_Sea
1992 Scout 15.5 Center Console
User avatar
Christian
Sporadic User
Posts: 129
Joined: Mon Aug 11, 2014 7:48 am
Location: Ottawa Ontario

Re: Seacock Replacement

Post by Christian »

Those look nice!

What did you use to glue the plates? Epoxy and kitty hair or 5200, 4200...? I am leaning towards the kitty hair myself!
I did not have a chance to complete the plates. Cluster F&#K at work all week ... And this weekend, Mothers Day. Having the folks over for brunch on Sunday. Weekend is basically shot :cry:

Christian
Post Reply