I have the original sea cocks as well. I would like to replace them and move the location. Currently they are under the engines, toward the crank pulleys and its hard to get my hands under there to open/close the valves. They are stiff turning.
I cleaned up my original Perko strainers and got 1 new sight glass. Still working fine. Wasn't sure how much of a PITA job it will be to replace them. Mostly worried about getting the old ones out. The articles on the Pbase website are pretty good for installing new thru hulls.
Course I'd like to replace the original fuel filters and lines, refurbish the dash, etc etc...
Seacock/Strainer advice do's/don'ts...
Moderators: BeaconMarineBob, Moderator, BeaconMarineDon
-
Bimmerbill
- Registered user
- Posts: 85
- Joined: Fri Mar 08, 2013 3:34 pm
- Location: NH
Re: Strainer advice do's/don'ts...
1984 Trojan 10 Meter International Express Cruiser
"The Help Desk"
Portsmouth NH/Kittery ME
"The Help Desk"
Portsmouth NH/Kittery ME
Re: Strainer advice do's/don'ts...
Its not too hard to patch the old holes and drill new ones where you want them. I had great luck with west system epoxy. take a look at the pic on page 28 , http://www.westsystem.com/ss/assets/How ... enance.pdf
it gives you an Idea on how to fix the old holes (ignore the vaccum baging stuff, I just thought the pic was a good example). since they are under your engines I would work from the bottom first, remove the old hardware, grind the surrounding area back you want a 12 to 1 bevel, use glass and epoxy starting with a large piece and working smaller to build up the thickness. I went a step further and did a similar patch on the inside when I removed a thru hull tranducer , I didnt go quite as deep with the grinding on the other side. you could easily remove ,patch, and re install in a day although you will also want to fair the bottom patch to smooth it out too. McMaster Carr sells solid fiberglass sheets in smaller sizes (cheap shipping) in 1/2 and 3/4 thickness that make great backing plates for your seacocks that will never ever rot.
it gives you an Idea on how to fix the old holes (ignore the vaccum baging stuff, I just thought the pic was a good example). since they are under your engines I would work from the bottom first, remove the old hardware, grind the surrounding area back you want a 12 to 1 bevel, use glass and epoxy starting with a large piece and working smaller to build up the thickness. I went a step further and did a similar patch on the inside when I removed a thru hull tranducer , I didnt go quite as deep with the grinding on the other side. you could easily remove ,patch, and re install in a day although you will also want to fair the bottom patch to smooth it out too. McMaster Carr sells solid fiberglass sheets in smaller sizes (cheap shipping) in 1/2 and 3/4 thickness that make great backing plates for your seacocks that will never ever rot.
Todd Pote
1987 10 Meter Mid Cabin
Double Pote-N_Sea
1992 Scout 15.5 Center Console
1987 10 Meter Mid Cabin
Double Pote-N_Sea
1992 Scout 15.5 Center Console
Re: Strainer advice do's/don'ts...
I thought the Sea-Cock threaded into/onto (not sure which side is male/female on this) the Thru-Hull?yorklyn wrote:I would not attempt that repair in the water. To replace the seacock the two bolts must be removed and the seacock must then be unscrewed from the thru hull which could break the thru hull loose. Its a very good way to ruin your 2014 boating season! New seacocks will require 3 bolts and you most likely wont be able to reuse the old ones. Depending on the cure time of the new sealants and material used to fill the old bolt holes, the swap could most likely be done in the sling of the travel lift in an hour or so. Good luck with the repair
I don't want to motor across Charleston Harbor to the lift with it like it is. Very dangerous. I plan to replace in-water (as we did the Strut several years ago). IF I find the thru-hull is where the crack is, then I will fill the whole thing with 5200 an to seal it and make an attempt to make it to the lift on the stbd engine alone (or tow it).
Captain Ross, 2009 Trojan Boater of the Year
"Viva Mahia" F32 Cummins 6BTA diesels,
"Mack Attack" Chaparral 244 Fish, SeaPro 180, McKee 14, Montauk-17

"Viva Mahia" F32 Cummins 6BTA diesels,
"Mack Attack" Chaparral 244 Fish, SeaPro 180, McKee 14, Montauk-17
Re: Strainer advice do's/don'ts...
the thru hull fitting goes through the hull and is threaded , the thru hull threads into the bottom of the seacock until the seacock is pulled tight against the backing plate on the hull (think thru hull as a bolt and seacock the nut) . The problem you will have doing it in the water is that you must back out the two bolts that go through the bottom of the hull and through the base of the seacock to remove it. (these keep it from unscrewing and add some additional clamping ).
Do you know exactly where its cracked? they are pretty hard to crack unless they are corroded bad or have been subjected to alot of force. Could it just be leaking through the seal? any Pics?
Do you know exactly where its cracked? they are pretty hard to crack unless they are corroded bad or have been subjected to alot of force. Could it just be leaking through the seal? any Pics?
Todd Pote
1987 10 Meter Mid Cabin
Double Pote-N_Sea
1992 Scout 15.5 Center Console
1987 10 Meter Mid Cabin
Double Pote-N_Sea
1992 Scout 15.5 Center Console
Re: Strainer advice do's/don'ts...
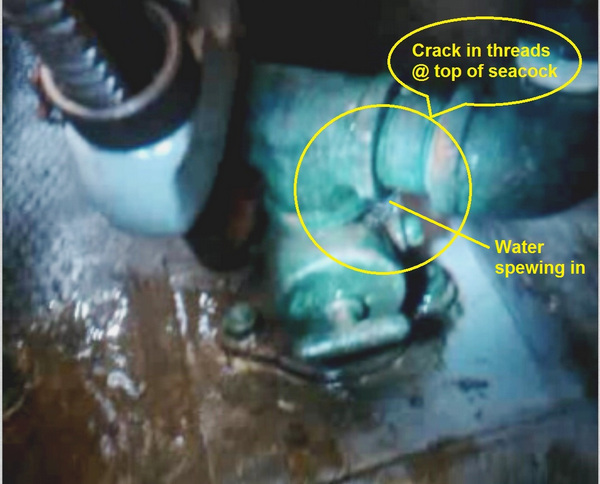
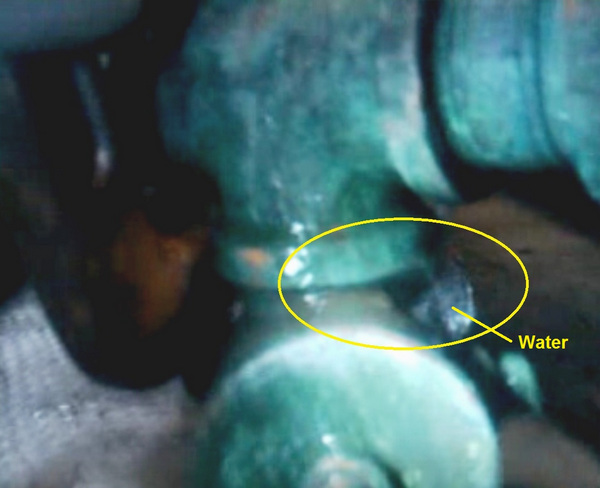
Yes, mine is cracked. Somewhere just below the barrel of the seacock at a flange in the vertical piping ... perhaps it was torqued too much during installation of the strainer/fittings above, who knows? But it IS cracked and pouring water in at an alarming rate. We have pressure on it to keep it from leaking profusely, but this will not work under way.

(Full-size: http://RNR-Marine.com/Trojan/Trojan-F32 ... 123627.jpg)
I believe (hope anyway) the original Trojan thru-hull/seacock setup was
Ref: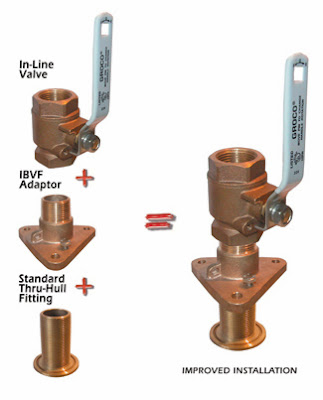
IF however, the original Trojan seacock setup looks like this, where the 2 bolts actually go through the seacock fitting itself (rather than a separate adapter), I'm screwed:


Does anyone (Yorklyn) know (have picture) of what would have been in an F32?
(Full-size: http://RNR-Marine.com/Trojan/Trojan-F32 ... 123627.jpg)
I believe (hope anyway) the original Trojan thru-hull/seacock setup was
- #1) outside: strainer/thru-hull fitting with w/ 2-bolts through the hull (not sure of bolts go through fitting or simply butt up to hull,
- #2) inside: flanged inline ball valve adapter (IBVF Adapter) with 2-bolts set 3-1/2" apart,
- #3) inside: T-handle barrel type seacock with seals and locking handle
Ref:
IF however, the original Trojan seacock setup looks like this, where the 2 bolts actually go through the seacock fitting itself (rather than a separate adapter), I'm screwed:
Does anyone (Yorklyn) know (have picture) of what would have been in an F32?
Captain Ross, 2009 Trojan Boater of the Year
"Viva Mahia" F32 Cummins 6BTA diesels,
"Mack Attack" Chaparral 244 Fish, SeaPro 180, McKee 14, Montauk-17
"Viva Mahia" F32 Cummins 6BTA diesels,
"Mack Attack" Chaparral 244 Fish, SeaPro 180, McKee 14, Montauk-17

Re: Strainer advice do's/don'ts...
Ross, a lot of OEMs don't bother with a base plate anymore. They simply install a thru-hull with the nut on the inside, and screw the valve onto it. The base plate is a better install though.
She was a 1969 36 ft wooden beauty with big blue 440s that we'll miss forever.
And thanks to the gang, 2012 Trojan Boater Of The Year
And thanks to the gang, 2012 Trojan Boater Of The Year
-
rickalan35
- Moderate User
- Posts: 790
- Joined: Mon Feb 06, 2006 1:37 pm
- Location: smiths falls, ontario, canada
Re: Strainer advice do's/don'ts...
My Tricabin (V-drives) had the original factory thru hull fitting set-up for the engines and the odd time, I would suck up some weeds. So I always kept a close eye on the temperature gauges. My original fittings and hoses were had something like 1 inch diameters I believe (small). Is 1 inch correct??? Regardless, they were probably the smallest you could buy at the time of installation. There were no strainers.
I decided to replace the whole system with modern and "enlarged" thru-hull fittings with summarily enlarged hoses plus I wanted to add strainers. I also realized that I didn't want to tackle the job of replacing them by myself. I paid to have it done by someone with experience. I glad now that I did because it was tricky even for him.
The intake hose on starboard engine had to extend toward the bow for 2 feet, go through the strainer and then do a U turn and head back to the engine intake which is also located on the outboard side. The port engine was easier because the intake hose could wrap around the rear of the engine from the outboard located thru hull fitting, then through the strainer located near the transmission and then finally around to the engine intake on the inboard side.
In my boat, although the new engine thu hull fittings (with backing blocks glassed in) were installed outboard the engines, the intake hoses lead around to a more convenient location for the strainers near the transmissions.
Now I routinely check the strainers before I head out. So, I think I'm pretty well set up now. I feel a lot more confident in shallower water than I used to and I feel as though the engines aren't ever starving for water. That last part was probably just all in my mind.
Should have done this years ago but I guess, everything in good time.
On a V- drive tricabin, we can check our oil by removing the doors beneath each rear berth. But now in order to check the strainers, I have to lift up the rear berth mattresses and plywood engine covers. This always means re-making the beds afterward. Small price to pay.
Trojan 1994 370 Express, 502 Bluewaters
Re: Strainer advice do's/don'ts...
So,
Does anyone (Yorklyn?) know (have pictures) of exactly what would have been in a 1974 F32?
I need to know how this comes apart so I can plan and buy the necessary components to fix it. I can;t get much better photos to work with, and can;t tell much from the photos.
I am in danger now ...
Does anyone (Yorklyn?) know (have pictures) of exactly what would have been in a 1974 F32?
I need to know how this comes apart so I can plan and buy the necessary components to fix it. I can;t get much better photos to work with, and can;t tell much from the photos.
I am in danger now ...
Captain Ross, 2009 Trojan Boater of the Year
"Viva Mahia" F32 Cummins 6BTA diesels,
"Mack Attack" Chaparral 244 Fish, SeaPro 180, McKee 14, Montauk-17
"Viva Mahia" F32 Cummins 6BTA diesels,
"Mack Attack" Chaparral 244 Fish, SeaPro 180, McKee 14, Montauk-17
-
mikeandanne
- Moderate User
- Posts: 628
- Joined: Sun Sep 09, 2012 11:30 am
Re: Strainer advice do's/don'ts...
this may be way out there but earlier I think you said you have a diver available,if so here is an idea from steam valves etc----could you send him down with underwater curing sealant and fill the strainer and inlet full then let it cure then run on one to get the boat to a lift to repair properly-----if that leaked on the way it would be very little---maybe he seals from under and you fill the cavity from above---just an idea----Mike
Re: Strainer advice do's/don'ts...
Yes, that is my worst case plan at this time. 3M 5200 cures in 30-45 minutes underwater. My previous diver (works on big ships at the shipyard changing props, struts etc. in water) and I changed the stbd strut in the water several years ago, so it depends on their skills as well.mikeandanne wrote:this may be way out there but earlier I think you said you have a diver available,if so here is an idea from steam valves etc----could you send him down with underwater curing sealant and fill the strainer and inlet full then let it cure then run on one to get the boat to a lift to repair properly-----if that leaked on the way it would be very little---maybe he seals from under and you fill the cavity from above---just an idea----Mike
Best case - if this can be change without removing the bolts, I will have my new diver scrape the area, put a piece of rubber over the thru-hull intake from the outside, and "glue" a large patch of rubber over the entire area (3M 5200 again) and we'll open the strainer inside and see if this seals it. If it does, we can perform the change in the water at my dock. But if the bolts go through the cracked seacock housing, then we have to pull the screws out from the outside and this probably too dangerous in the water. 6 1/2" strut holes are one thing (dowll pins plugged each as we worked), but an open 1.5-2" hole int he bottom is dangerous.
I really don't want to have to head down my curvy creek (about 2 miles), then across the harbor (constant container and cargo ships and tug traffic) on one engine ... Brought her home once on 1 engine, and it was not something I would do on purpose again.
Off to take more pictures of the seacock now ...
Captain Ross, 2009 Trojan Boater of the Year
"Viva Mahia" F32 Cummins 6BTA diesels,
"Mack Attack" Chaparral 244 Fish, SeaPro 180, McKee 14, Montauk-17
"Viva Mahia" F32 Cummins 6BTA diesels,
"Mack Attack" Chaparral 244 Fish, SeaPro 180, McKee 14, Montauk-17
Re: Strainer advice do's/don'ts...
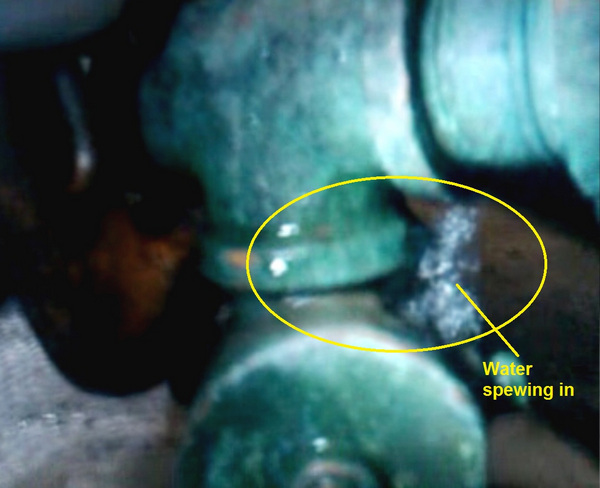
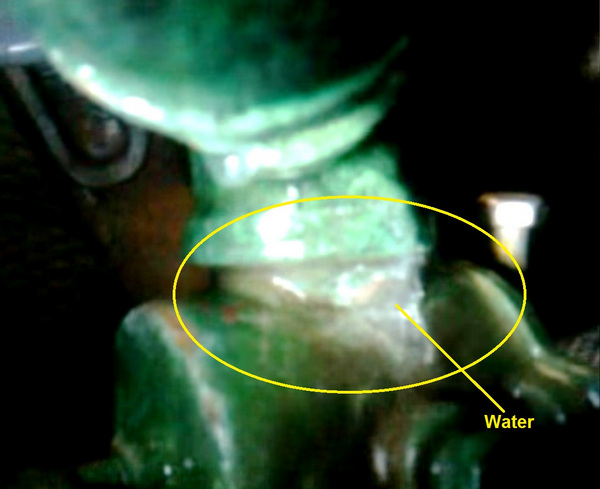
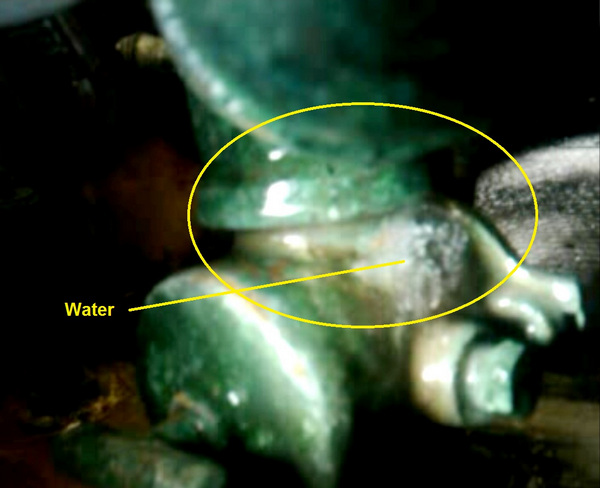
Video shows the problem.
My port engine's barrel seacock does indeed have a flanged base with the 2-bolt holes (not slots as shown on some people's boats).
My crack is in the threads where the fitting screws onto the TOP of the seacock.
The seacock has been frozen open for several years as the short lever arm is too far under the front harmonic balancer to reach it). If I can free it and close it, I will be in good shape to pull the fittings off the top of it and assess the damage safely.
Any tips on freeing the barrel seacock up, so it can be shut?
I loosened the T handle (works easy) and put some torque (20 ft-lbs or so) on the lever, but it doesn't want to move. I don't want to force it ....
Video: http://RNR-Marine.com/trojan/Trojan-F32 ... 142838.3gp
Images:
1)
2)
3)
4)
5)
Captain Ross, 2009 Trojan Boater of the Year
"Viva Mahia" F32 Cummins 6BTA diesels,
"Mack Attack" Chaparral 244 Fish, SeaPro 180, McKee 14, Montauk-17
"Viva Mahia" F32 Cummins 6BTA diesels,
"Mack Attack" Chaparral 244 Fish, SeaPro 180, McKee 14, Montauk-17
-
Commissionpoint

- Active User
- Posts: 1197
- Joined: Wed Oct 05, 2011 11:59 pm
- Location: Diamond Point on Lake George, NY
Re: Strainer advice do's/don'ts...
$hitty. You gotta do something about that, and soon.
Do you have a generator intake thru-hull that you could plumb your engine to on a temporary basis in order to make it to a sling? That would probably be enough cooling to run at slow speeds to the harbor. You could plug that from below and make a careful run. In fact you should be working on plugging that from below right away. Before it sinks at the dock.
If it was me I would first plug the thru hull before anything catastrophic happens. Then I would seek my best alternate cooling option for the engine and get the whole thing to a lift. At that point whatever you choose for a solution is up to you. Getting it to the lift for refit is the problem.
1978 F-32 "Eclipse"
Merc 305 SBC's
1.52:1 Borg Warners
1983 Correct Craft
Commander 351 Ford (PCM)
1:1 Borg Warner
There are 350 different varieties of shark, not counting loan or pool.
Merc 305 SBC's
1.52:1 Borg Warners
1983 Correct Craft
Commander 351 Ford (PCM)
1:1 Borg Warner
There are 350 different varieties of shark, not counting loan or pool.
Re: Strainer advice do's/don'ts...
Ross, try loosening the bolts on the side that has the shut-off handle. You should be able to turn the handle after that. Then just tighten the bolts again. If the crack is above the valve, this may stop the leak until you can repair.
She was a 1969 36 ft wooden beauty with big blue 440s that we'll miss forever.
And thanks to the gang, 2012 Trojan Boater Of The Year
And thanks to the gang, 2012 Trojan Boater Of The Year
Re: Strainer advice do's/don'ts...
GREAT IDEA! Sometimes you get so caught up in the problem that you don't think out of the box enough to come up with a creative solution. That will work, and I will begin sleeping again at night. My generator intake (shut off when not in use, and with a better quality strainer setup as well) is the same size, and located behind the port engine, so I can run a new, longer hose to it once I plug this mess up.Commissionpoint wrote: Do you have a generator intake thru-hull that you could plumb your engine to on a temporary basis in order to make it to a sling? That would probably be enough cooling to run at slow speeds to the harbor. You could plug that from below and make a careful run. In fact you should be working on plugging that from below right away. Before it sinks at the dock.
Thanks for thinking of that!
Captain Ross, 2009 Trojan Boater of the Year
"Viva Mahia" F32 Cummins 6BTA diesels,
"Mack Attack" Chaparral 244 Fish, SeaPro 180, McKee 14, Montauk-17
"Viva Mahia" F32 Cummins 6BTA diesels,
"Mack Attack" Chaparral 244 Fish, SeaPro 180, McKee 14, Montauk-17
Re: Strainer advice do's/don'ts...
I'll give it a try.Big D wrote:Ross, try loosening the bolts on the side that has the shut-off handle. You should be able to turn the handle after that. Then just tighten the bolts again. If the crack is above the valve, this may stop the leak until you can repair.
1) Are the lever-cover bolts bronze (they appear to be in the pictures below)?
2) How much torque do you think I can put on them safely?
3) Do you think this will free it up - or do you think I have marine growth inside impeding its ability to rotate?


Captain Ross, 2009 Trojan Boater of the Year
"Viva Mahia" F32 Cummins 6BTA diesels,
"Mack Attack" Chaparral 244 Fish, SeaPro 180, McKee 14, Montauk-17
"Viva Mahia" F32 Cummins 6BTA diesels,
"Mack Attack" Chaparral 244 Fish, SeaPro 180, McKee 14, Montauk-17