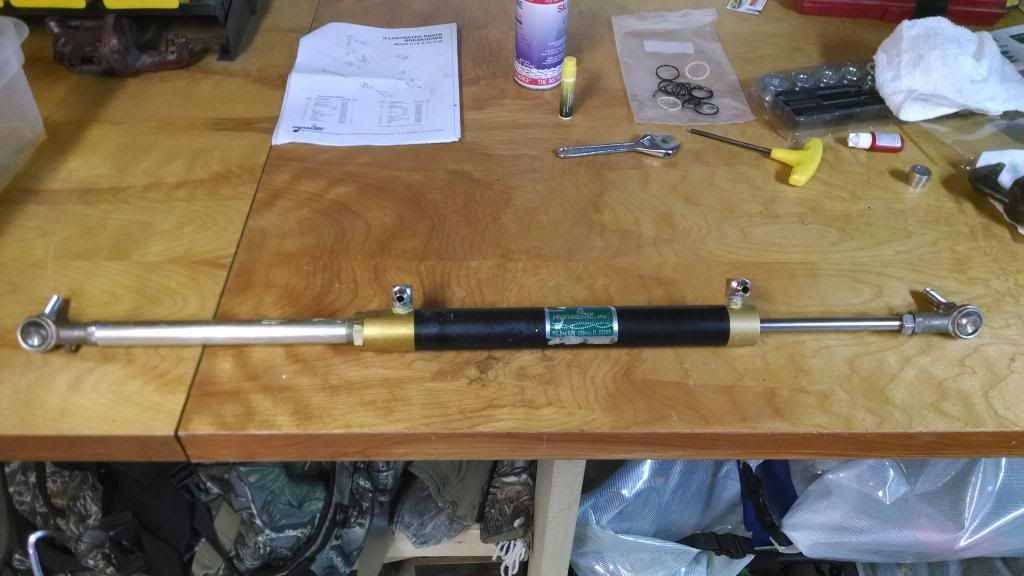
Instructions on how to rebuild a Hynautic K-19 steering cyl
Moderators: BeaconMarineBob, Moderator, BeaconMarineDon
Instructions on how to rebuild a Hynautic K-19 steering cyl
I couldn't find any good info online on how to rebuild a Hynautic Steering Cylinder. I figured it out on my own, took some pictures and thought I'd share with everyone. First of all, its very easy to do once you figure out how to disassemble it. Heres a picture of the rebuilt cylinder
2014-03-09102307_zpsd46185d2.jpg
The first thing to do is order a Rebuild kit. for the k-19 cylinder the kit you need is Teleflex KS02.
[
First thing you do is un screw the two ball joint ends. then loosen the large lock nut on the side opposite the ram and un screw the aluminum tube. then remove the two allen head drain screws and hose fittings (my ram had been previously drained of oil). its now time to remove the ends.
If you look at the picture of the rebuild parts above you will see two metal rods. If you look at the one on the left you can see it has a hook on one end. The hooked end of the rod is inserted into a slit in the cylinder tube. as the the end is rotated while in the cylinder body , it draws this rod into the end cap and wraps it into a groove in the body of the cylinder which locks it in place. here is a picture an end cap, you can see the slot and the groove that its drawn into between the orings.
to take the cylinder apart you are supposed to rotate the end cap in the direction that draws the "hooked wire " around with it. mine did not draw the wire when rotated in either direction. I figured out that the slot in the cap that the hook is supposed to grab lines up with the hydraulic fitting. I had to rotate the end cap while looking through the slit in the tube body. when i saw the curved top of the hook in the slit i took a small screwdriver and a hammer and gave it a smack to slightly bend the hook down into the groove. after I did this, the hook grabbed. when I rotated it it drew the wire with it. I rotated it until I saw the tail end in the slit in the body. I then took a small screwdriver and bent the tail end up through the slit. at this point all you have to do is rotate the end cap in the opposite direction and the wire backs it way out and you have this.
Then This!
2014-03-09120552_zps4aa59347.jpg
2014-03-07155221_zps5cff1cde.jpg
you then need to remove the retaining from each end cap. the ring has a small notch at the tip. I used a small screwdriver to pry the ring out using the notch then carefully pulled it out. once its out you can remove the white teflon bearing and oring. once apart I cleaned everything in mineral spirits until completely clean. I used a dental pick to help rem ove old thread lock. Inspect for and rust scratches or gouges that may destroy the new seals, mine was good so I got lucky for once! Here is a picture of everything taken apart. a few things to note are that on the "ram" side there is a rubber "wiper" that is inserted in the outside of that sides end cap which is not shown. the ram side end cap will get a new rubber wiper that is inserted on the outside where the ram extends out. on the inside you insert a new oring then the original white bearing which is held in place with a new retaining ring. the end cap that the "arm " threads into gets a new white split washer inside, then a oring and retaining ring. there is no rubber wiper on this cap. the ram gets two new white split washers with a new oring in between.
once the internals are put back in the end caps and new oring on the ram, put two new orings on the outside of each cap. insert the ram back into the body then carefully install the end caps being sure not to damage anything while putting the ram through them. line the hydraulic fitting holes up with the slits in the body. then take one of the new wires, insert it into the slit, hook side down. slowly rotate the end cap so that the wire is pulled inside the body forming a radius in the wire. do this for both sides. screw the extension tube into the end cap and tighten lock nut. screw hydraulic fittings back in. put the last two small plastic washers on the allen bolts and install, screw the ball joint ends on and your done!!!!!
#######################################################################################################################
Note From the Moderator I was able to restore some photos . Sorry they are not in the right order but should help if need to rebuild your k-18 or k-19
##########################################################################################################################
2014-03-09102307_zpsd46185d2.jpg
The first thing to do is order a Rebuild kit. for the k-19 cylinder the kit you need is Teleflex KS02.
[
First thing you do is un screw the two ball joint ends. then loosen the large lock nut on the side opposite the ram and un screw the aluminum tube. then remove the two allen head drain screws and hose fittings (my ram had been previously drained of oil). its now time to remove the ends.
If you look at the picture of the rebuild parts above you will see two metal rods. If you look at the one on the left you can see it has a hook on one end. The hooked end of the rod is inserted into a slit in the cylinder tube. as the the end is rotated while in the cylinder body , it draws this rod into the end cap and wraps it into a groove in the body of the cylinder which locks it in place. here is a picture an end cap, you can see the slot and the groove that its drawn into between the orings.
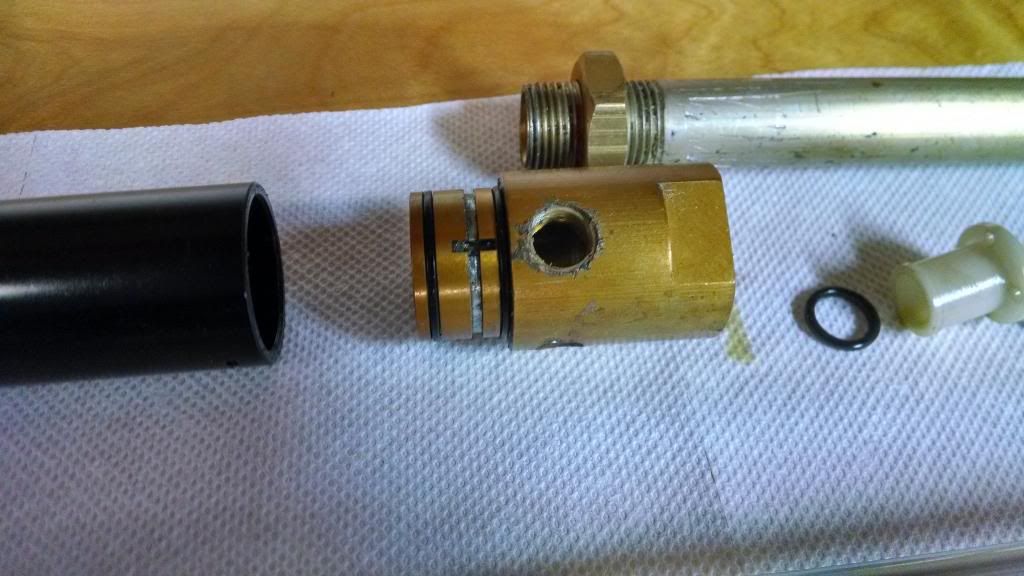
to take the cylinder apart you are supposed to rotate the end cap in the direction that draws the "hooked wire " around with it. mine did not draw the wire when rotated in either direction. I figured out that the slot in the cap that the hook is supposed to grab lines up with the hydraulic fitting. I had to rotate the end cap while looking through the slit in the tube body. when i saw the curved top of the hook in the slit i took a small screwdriver and a hammer and gave it a smack to slightly bend the hook down into the groove. after I did this, the hook grabbed. when I rotated it it drew the wire with it. I rotated it until I saw the tail end in the slit in the body. I then took a small screwdriver and bent the tail end up through the slit. at this point all you have to do is rotate the end cap in the opposite direction and the wire backs it way out and you have this.
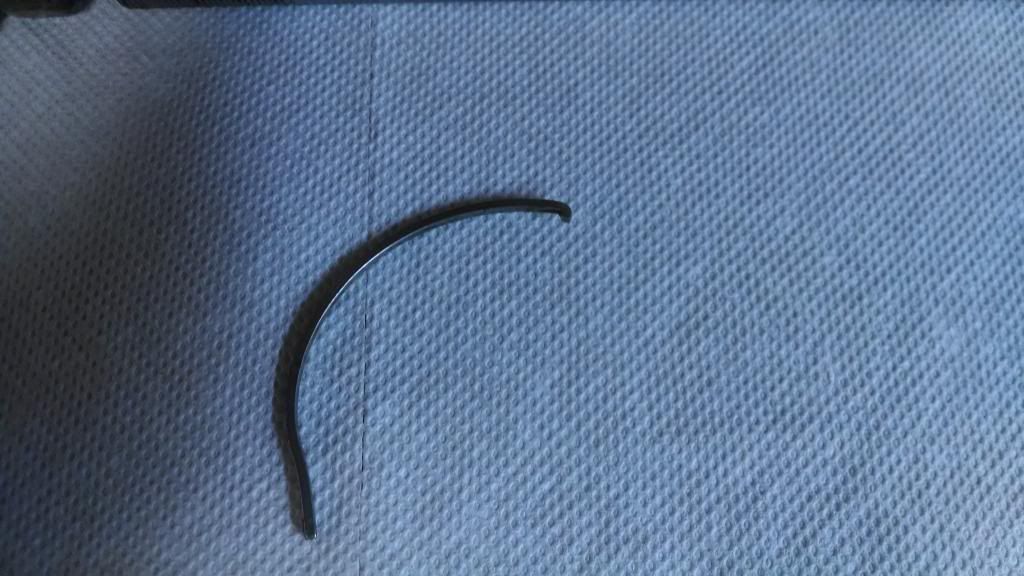
Then This!
2014-03-09120552_zps4aa59347.jpg
2014-03-07155221_zps5cff1cde.jpg
you then need to remove the retaining from each end cap. the ring has a small notch at the tip. I used a small screwdriver to pry the ring out using the notch then carefully pulled it out. once its out you can remove the white teflon bearing and oring. once apart I cleaned everything in mineral spirits until completely clean. I used a dental pick to help rem ove old thread lock. Inspect for and rust scratches or gouges that may destroy the new seals, mine was good so I got lucky for once! Here is a picture of everything taken apart. a few things to note are that on the "ram" side there is a rubber "wiper" that is inserted in the outside of that sides end cap which is not shown. the ram side end cap will get a new rubber wiper that is inserted on the outside where the ram extends out. on the inside you insert a new oring then the original white bearing which is held in place with a new retaining ring. the end cap that the "arm " threads into gets a new white split washer inside, then a oring and retaining ring. there is no rubber wiper on this cap. the ram gets two new white split washers with a new oring in between.
once the internals are put back in the end caps and new oring on the ram, put two new orings on the outside of each cap. insert the ram back into the body then carefully install the end caps being sure not to damage anything while putting the ram through them. line the hydraulic fitting holes up with the slits in the body. then take one of the new wires, insert it into the slit, hook side down. slowly rotate the end cap so that the wire is pulled inside the body forming a radius in the wire. do this for both sides. screw the extension tube into the end cap and tighten lock nut. screw hydraulic fittings back in. put the last two small plastic washers on the allen bolts and install, screw the ball joint ends on and your done!!!!!
#######################################################################################################################
Note From the Moderator I was able to restore some photos . Sorry they are not in the right order but should help if need to rebuild your k-18 or k-19
##########################################################################################################################
- Attachments
-
- 2014-03-09120552_zps4aa59347.jpg (64.21 KiB) Viewed 10945 times
-
- 2014-03-09102307_zpsd46185d2.jpg (29.25 KiB) Viewed 10945 times
-
- 2014-03-09102228_zpsd728f760.jpg (68.91 KiB) Viewed 10945 times
-
- 2014-03-09102219_zps77f78a09.jpg (62.94 KiB) Viewed 10945 times
-
- 2014-03-09102201_zps895fdfda.jpg (51.28 KiB) Viewed 10945 times
-
- 2014-03-07155245_zps9c968074.jpg (56.25 KiB) Viewed 10945 times
-
- 2014-03-07155235_zpsc9df1183.jpg (50.06 KiB) Viewed 10945 times
-
- 2014-03-07155221_zps5cff1cde.jpg (63.04 KiB) Viewed 10945 times
Todd Pote
1987 10 Meter Mid Cabin
Double Pote-N_Sea
1992 Scout 15.5 Center Console
1987 10 Meter Mid Cabin
Double Pote-N_Sea
1992 Scout 15.5 Center Console
Re: Instructions on how to rebuild a Hynautic K-19 steering
Todd, great write-up. I've been meaning to look into doing this at some point. I think I'll at least order the kit now.
We should really start an FAQ or DIY section (by model) here. Don't you guys think?
Bob
We should really start an FAQ or DIY section (by model) here. Don't you guys think?
Bob
1988 10m mid cabin
- prowlersfish
- 2024 Gold Support
- Posts: 12709
- Joined: Sat Nov 05, 2005 6:56 pm
- Location: Lower Chesapeake Bay ,Va
Re: Instructions on how to rebuild a Hynautic K-19 steering
Great job Todd ! of course we expect this from the Trojan boater of the year .
Boating is good for the soul
77/78 TROJAN F36 Conv.
6BTA Cummins diesels
Life is to short for a ugly boat
77/78 TROJAN F36 Conv.
6BTA Cummins diesels
Life is to short for a ugly boat
Re: Instructions on how to rebuild a Hynautic K-19 steering
Thanks Guys! If anyone plans on doing this or has any other questions just ask.
Todd Pote
1987 10 Meter Mid Cabin
Double Pote-N_Sea
1992 Scout 15.5 Center Console
1987 10 Meter Mid Cabin
Double Pote-N_Sea
1992 Scout 15.5 Center Console
- prowlersfish
- 2024 Gold Support
- Posts: 12709
- Joined: Sat Nov 05, 2005 6:56 pm
- Location: Lower Chesapeake Bay ,Va
Re: Instructions on how to rebuild a Hynautic K-19 steering
This should be helpful doing mine thanks
Boating is good for the soul
77/78 TROJAN F36 Conv.
6BTA Cummins diesels
Life is to short for a ugly boat
77/78 TROJAN F36 Conv.
6BTA Cummins diesels
Life is to short for a ugly boat
-
- 2024 Gold Support
- Posts: 1876
- Joined: Mon Sep 28, 2009 5:08 pm
- Location: Canton, TX Boat on TEXOMA
Re: Instructions on how to rebuild a Hynautic K-19 steering
Great job. Am I correct that there is not kit or way to rebuild the steering wheel end, or have I got the wrong brand in mind?
Larry Eddington
1984 F-36 Tri Cabin "The Phoenix II"
1978 F-28 "The Phoenix"
Fish Master 2350 Bay Boat
9.5' Dink
1984 F-36 Tri Cabin "The Phoenix II"
1978 F-28 "The Phoenix"
Fish Master 2350 Bay Boat
9.5' Dink
- prowlersfish
- 2024 Gold Support
- Posts: 12709
- Joined: Sat Nov 05, 2005 6:56 pm
- Location: Lower Chesapeake Bay ,Va
Re: Instructions on how to rebuild a Hynautic K-19 steering
If its Hynautic there is .
Boating is good for the soul
77/78 TROJAN F36 Conv.
6BTA Cummins diesels
Life is to short for a ugly boat
77/78 TROJAN F36 Conv.
6BTA Cummins diesels
Life is to short for a ugly boat
- prowlersfish
- 2024 Gold Support
- Posts: 12709
- Joined: Sat Nov 05, 2005 6:56 pm
- Location: Lower Chesapeake Bay ,Va
Re: Instructions on how to rebuild a Hynautic K-19 steering
Pull the cylinder off yesterday am and replaced the seals and was under way after lunch . Job when real smooth other than getting that (wire ) retainer out . Thanks for a great post .
Boating is good for the soul
77/78 TROJAN F36 Conv.
6BTA Cummins diesels
Life is to short for a ugly boat
77/78 TROJAN F36 Conv.
6BTA Cummins diesels
Life is to short for a ugly boat
Re: Instructions on how to rebuild a Hynautic K-19 steering cyl
I am looking to put a new autopilot on my 14M Trojan Intnl Convertible.
Does anyone know what the cubic inches are on the steering ram?
Thanks,
--KEN
Does anyone know what the cubic inches are on the steering ram?
Thanks,
--KEN
- WayWeGo
- 2024 Gold Support
- Posts: 782
- Joined: Fri Feb 13, 2015 11:13 am
- Location: Oakton, VA / Rhode River - Chesapeake Bay
Re: Instructions on how to rebuild a Hynautic K-19 steering
+1 on the great write-up!BobCT wrote:Todd, great write-up. I've been meaning to look into doing this at some point. I think I'll at least order the kit now.
We should really start an FAQ or DIY section (by model) here. Don't you guys think?
Bob
I use this site quite a bit for figuring out stuff on our boat, and probably would not have bought a Trojan if not for having this great resource. The search function has be great for finding the info, though I usually get distracted and learn much more than I started looking for!
1975 F-36 Convertible
Twin Chrysler 440's
Twin Chrysler 440's
- prowlersfish
- 2024 Gold Support
- Posts: 12709
- Joined: Sat Nov 05, 2005 6:56 pm
- Location: Lower Chesapeake Bay ,Va
Re: Instructions on how to rebuild a Hynautic K-19 steering cyl
You can look it up by the number on the rameitherorr wrote:I am looking to put a new autopilot on my 14M Trojan Intnl Convertible.
Does anyone know what the cubic inches are on the steering ram?
Thanks,
--KEN
Boating is good for the soul
77/78 TROJAN F36 Conv.
6BTA Cummins diesels
Life is to short for a ugly boat
77/78 TROJAN F36 Conv.
6BTA Cummins diesels
Life is to short for a ugly boat
- prowlersfish
- 2024 Gold Support
- Posts: 12709
- Joined: Sat Nov 05, 2005 6:56 pm
- Location: Lower Chesapeake Bay ,Va
Re: Instructions on how to rebuild a Hynautic K-19 steering cyl
Working on restoring this thread with help form the Trojan boat staff . Here are some of mine on the one I just did .
- Attachments
-
- Resized_20200104_164940.jpeg (28.68 KiB) Viewed 10938 times
-
- piston seal.jpeg (27.02 KiB) Viewed 10938 times
-
- pistion seal 2.jpeg (39.19 KiB) Viewed 10938 times
-
- cly clips.jpeg (67.46 KiB) Viewed 10938 times
Boating is good for the soul
77/78 TROJAN F36 Conv.
6BTA Cummins diesels
Life is to short for a ugly boat
77/78 TROJAN F36 Conv.
6BTA Cummins diesels
Life is to short for a ugly boat
- WayWeGo
- 2024 Gold Support
- Posts: 782
- Joined: Fri Feb 13, 2015 11:13 am
- Location: Oakton, VA / Rhode River - Chesapeake Bay
Re: Instructions on how to rebuild a Hynautic K-19 steering cyl
Thanks for resurrecting this thread!
I have a K-51 cylinder which Teleflex no longer makes a rebuild kit for. When I talked to their support, there were a couple of parts that are no longer available, so I cannot even source the individual parts. If mine leaks, I will have to try to rebuild it the best I can or buy a new cylinder.
1975 F-36 Convertible
Twin Chrysler 440's
Twin Chrysler 440's
- WayWeGo
- 2024 Gold Support
- Posts: 782
- Joined: Fri Feb 13, 2015 11:13 am
- Location: Oakton, VA / Rhode River - Chesapeake Bay
Re: Instructions on how to rebuild a Hynautic K-19 steering cyl
Now I am really excited that this thread was resurrected!
After making the last post, I decided to do another look for the KS-14 rebuild kit for my K-51 cylinder and found a new source that I had not seen before. Twice I have found a company who showed it in stock and ordered from them. Both charged my credit card but later canceled the order and gave me a refund. I figured that would happen again, but was surprised to actually get the part this time.
The envelope was quite dusty and the manufacturing date was 2009, so it must have been lost on the shelf for years. Shipping was way too high, but I am not complaining!
And it appears to be the last one they had since I thought about buying another to keep on my shelf, but it is now showing out of stock.
1975 F-36 Convertible
Twin Chrysler 440's
Twin Chrysler 440's
- prowlersfish
- 2024 Gold Support
- Posts: 12709
- Joined: Sat Nov 05, 2005 6:56 pm
- Location: Lower Chesapeake Bay ,Va
Re: Instructions on how to rebuild a Hynautic K-19 steering cyl
If needed I bet the o-rings could be matched up and that's what fails most the time
Boating is good for the soul
77/78 TROJAN F36 Conv.
6BTA Cummins diesels
Life is to short for a ugly boat
77/78 TROJAN F36 Conv.
6BTA Cummins diesels
Life is to short for a ugly boat