Page 3 of 5
Re: Seacock Replacement
Posted: Tue May 19, 2015 7:41 am
by Barrie
Wow Christian! looks like you're just "givin it".
I can't add anything useful here other than great work and I hope you get it in the water this summer yet.
Great articles in this post.......printed for future use

Re: Seacock Replacement
Posted: Tue May 19, 2015 8:20 am
by Christian
Hi Barrie.
Its nice to hear this is going to be useful for someone! Since I can't really contribute a lot on this forum yet, might as well record what I'm doing god or bad such that others don't do the same mistakes...
As mentioned by a few others the West System's "how to" was invaluable along with
http://www.pbase.com!
Probably going back to the boat today. First I need to order the last 3 seacocks I need along with 5200 and plumber's putty.
Oh! Almost forgot! I need 16 spark plugs

I might try to start the engines today. Wish me luck!
Christian
Re: Seacock Replacement
Posted: Tue May 19, 2015 12:44 pm
by Barrie
LOL! 16 plugs, never considered that. And 2xwires, caps, oil, filters etc.
Although my Jag is V12 and that was bad!
May the force be with you
Re: Seacock Replacement
Posted: Tue May 19, 2015 1:48 pm
by Christian
Today I made the last 3 backing plates! Ready to install

I ordered a few odds and ends. $700 later, I have on order:
1x 1-1/2 seacock + through hull
1x 1-1/4 seacock + through hull
1x 3/4 seacock + extra long through hull
4 x scoops for the v-drives
2 tubes of 5200
West System fairing filler
16 spark plugs
I will have replaced all the old hardware with proper/new. The funny thing is that, i beleive, most people would not care about this! Its not shiny, its not sexy and you don't see it. But for me if its out of sight and out of mind, let's do it so it doesn't wake me up at night! You know the feeling?
So in total l will have replaced:
1x 1-1/2 seacock + through hull
3 x 1-1/4 seacock + through hull
4 x 1 inch seacock + through hull
2 x 3/4 inch seacock + through hull
All for peace of mind for the next 40 years!
Anyhow, off to the boat

Christian
Re: Seacock Replacement
Posted: Tue May 19, 2015 7:47 pm
by Christian
Hi guys!
I got to the boat after a quick nap.
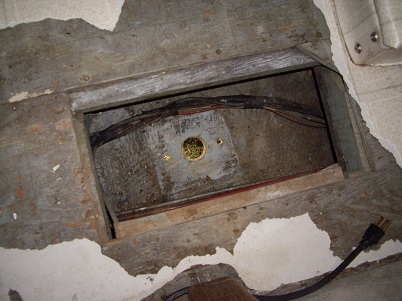
I installed 2 backing plates in the lasarette. Access was ok I guess
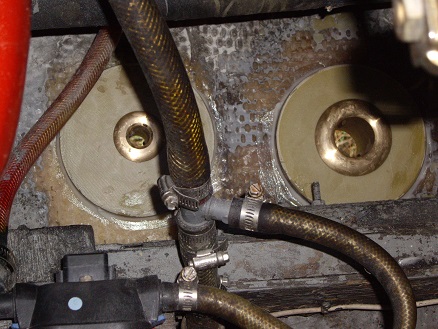
- IMGP2010small.jpg (129.11 KiB) Viewed 7424 times
With the leftover epoxy I made this little device...
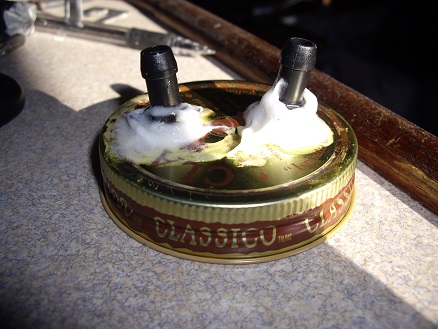
- IMGP2009small.jpg (119.21 KiB) Viewed 7424 times
I'm not saying what it is just yet but I might have to start a new thread on this one...
I also did a test fit of the raw water inlet seacock. It is dusty but don't worry, I will clean the area before committing. Now I need to uncover the location of the seacock in the aft head...
Christian
- IMGP2011small.jpg (131.52 KiB) Viewed 7424 times
Re: Seacock Replacement
Posted: Wed May 20, 2015 7:38 am
by Barrie
I'm guessing your mystery part is the lid to a thumper for moonshine.
It's about time you added that! You'll enjoy the results

Re: Seacock Replacement
Posted: Wed May 20, 2015 6:30 pm
by Christian
Hi Guys!
Slow progress today. I now have a full blown cold!

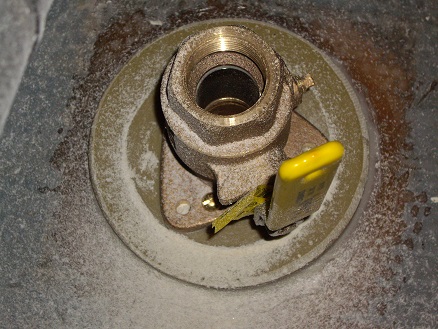
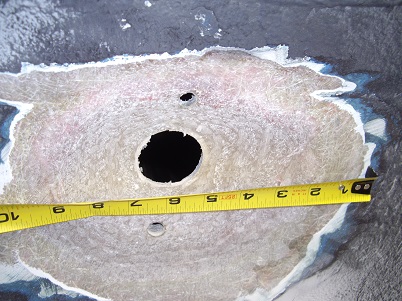
Anyhow, I managed to clean the oozed epoxy from the holes so that the through hulls go through easy. I also cleaned off the silicon from the bottom ready to accept the new through hulls. I opened the aft head flooring and uncovered the last seacock and removed it. It was closed off but not properly and the floor trap was covered by the glued on flooring. finally there was nothing connected to it... Thank God the PO did not have an emergency!
- IMGP2012small.jpg (107.33 KiB) Viewed 7403 times
- IMGP2013small.jpg (108.41 KiB) Viewed 7403 times
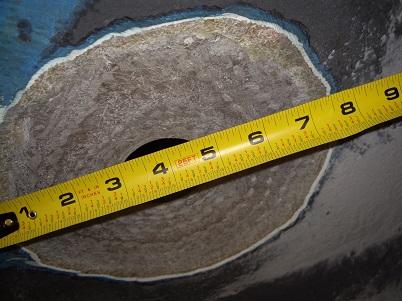
I also started grinding the hull to patch the holes with fiberglass. The Grinding wheel I purchased yesterday works much better that the regular sandpaper. A lot faster but not fast enough!!! it is taking for ever and the hull is super thick. This hull is indestructible
In this area it is at least 3/4 in thick!
- IMGP2014small.jpg (122.93 KiB) Viewed 7403 times
Re: Seacock Replacement
Posted: Wed May 20, 2015 6:48 pm
by Christian
The second one:
- IMGP2015small.jpg (114.48 KiB) Viewed 7401 times
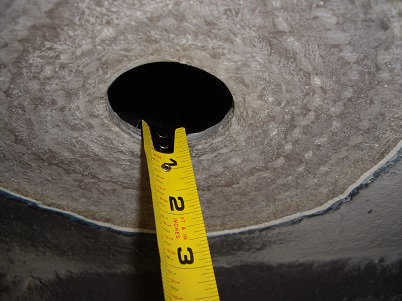
- IMGP2016small.jpg (107.01 KiB) Viewed 7401 times
I'm thinking I'll grind from the interior as well.
Do you guys think its enough? I could go more...
Tomorrow, I will grind the last one under the head. I actually though I was going to have to replace it but since there was nothing connected to it, I will just block it off. I still wonder what it was for. Any thought?
Unfortunately, it is really cold at the marina and should last until Sunday. I was not able to look at the engines at all. Maybe tomorrow...
I might start cutting the through hull to length tomorrow as well.
Hope you guys are not to tired of reading this.
Christian
Re: Seacock Replacement
Posted: Wed May 20, 2015 6:51 pm
by Christian
Oh! And Barrie,
You are so close! Not really...
Christian
Re: Seacock Replacement
Posted: Wed May 20, 2015 9:04 pm
by yorklyn
I think you are doing a great job. when you go to fill the holes, coat the entire area with a thin coat of unthickened epoxy. I always followed that up with a thin skim coat of epoxy mixed with 406 filler (cabosil) and then began my laminating with cloth. I used the thickened epoxy to fill in any irregularities in the substrate allowing better adhesion to the initial layer. i then alternated chopped strand and fiberglass cloth until i had the desired thickness. use a squeege or fiberglass roller to get the air bubbles out
Re: Seacock Replacement
Posted: Wed May 20, 2015 9:30 pm
by Christian
Thanks Yorklyn!
Much appreciated. Wait until I do the glass! You'll see what the doohickey I made with the leftovers is for...
Christian
Re: Seacock Replacement
Posted: Wed May 20, 2015 9:35 pm
by Christian
Maybe I spoke too much Todd! Barrie might catch on to the use of my gadget...
You sound like you are a DIY kind of guy. You might appreciate it!
Christian
Re: Seacock Replacement
Posted: Wed May 20, 2015 10:02 pm
by yorklyn
be careful to seal the hole with tape from the opposite side before you use your vacuum doohickey
Re: Seacock Replacement
Posted: Wed May 20, 2015 10:18 pm
by Barrie
My interest is peaked, I was going to guess that it was a lid to a mason jar bong, but i'm thinking now it has something to do with glassing in the holes??
If you continue with this type of work I am going to be jealous.
I will start a thread soon of my tri-fly project, and it won't be for the faint of heart!
Thanks for sharing Christian.
Barrie
Re: Seacock Replacement
Posted: Wed May 20, 2015 11:36 pm
by captainmaniac
Christian wrote:This hull is indestructible
In this area it is at least 3/4 in thick!
You will grow to love how Trojan built these battle wagons. Very few vendors have built to the same standards as Trojan did in our vintage.
They used to build 1" thick wood hulls, so when they transitioned, 1" thick fiberglass made sense.