Page 6 of 13
Panels design
Posted: Tue Apr 05, 2011 6:24 pm
by larryeddington
Check out this website, they provide the software to design what you want and then make it out of many different king of materials.
http://www.frontpanelexpress.com
Good luck with your health.
Posted: Wed Apr 06, 2011 7:24 pm
by foofer b
PK, the photos of you were fine. Besides it's your thread, you can put anything you want. But no pictures of you in your tighty whiteys!!!
Posted: Wed Apr 06, 2011 8:26 pm
by RWS
get better and get back on the water soon!
RWS
Posted: Sun Apr 24, 2011 7:01 am
by pk
Hello all! As you could see on another string here on the forum, I have started again getting my Trojan ready. My health is much better, heart and lounges work as normal, and my mood is rising. With other words; the future is so bright I have to wear shades......
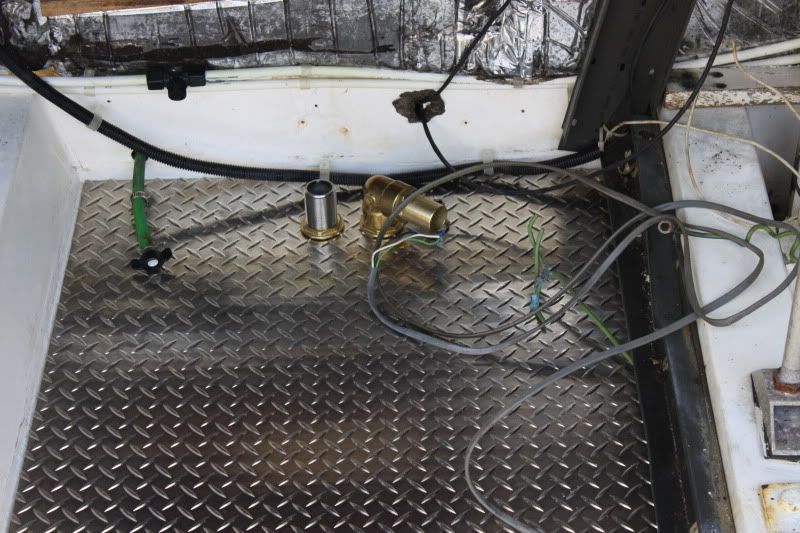
Yesterday I glued down the lid of holding tank, after I had fitted tubes and fittings. I also mounted the new water heating tank, and fixed the hoses for the engine. Today I will put vacuum in the holding tank, just to see if it is OK. Then I will fit rest of the pipes and hoses to the vacuum pump, connect the toilet, and call it a day.
Nice, ehh??
So tomorrow I will start with the last cleaning in engine room, I will put on a couple of seawater filters, two diesel screeners, and make the rest of wiring for the engines. So on Tuesday I hope we can start lift the engines in.
Posted: Sun Apr 24, 2011 7:40 am
by RWS
Lid looks nice. Here's a couple of things to consider:
1. this lid is also supports your batteries. Might be a good idea to reinforce that area due to all that weight. Also the factory lid had a baffle in the middle to reduce the "sloshing" factor. Might be something you could easily add to the bottom of your lid. If that aluminum lid flexes, better reinforce it in a few places with some welded angle or tube.
2. fill in the old holes that attached the old lid with WEST SYSTEM or something similar.
3. Sand the lid facing as smooth as possible with an electric or air sander. Don't skimp here.
4. Drill new holes and use staggered bolts with large flat washers (STAINLESS) to spread the load evenly.
5. Dry fit the lid several times and make absolutely sure that you get a good fit.
6. Use 3-M 5200 sealant and plenty of it for a good seal and make certain that both surfaces are roughed up and absolutely clean before you start.
7. Don't overtighten the bolts. You don't want to squeeze out all the 5200.
6. Don't cut any corners on this project. A good seal and a long life are absolutely necessary to the long term enjoyment of your boat. A pinhole leak will result in $hit & pi$$ sloshing around all over your engine room and the whole boat will stink. Repair will require removal of the batteries and the battery box and a huge effort to remove the lid with chisels and crowbars, believe me, I know.
7. Avoid the use of any chemical treatment to your waste tank. After hurricane Charley several of my neighbors and I used the boat head as we had no water or sewer. I overcompensated for this by overloading the tank with holding tank chemicals. This softened up the lid seal and now you know the result. It was NASTY and took a bit to figure it all out. Y U K !!!
I don't know of any other International owner who has done the reseal job, and you are the only other boat I've heard about with a missing lid.
The only thing we ever add to our tank now is an occasional dose of liquid dish detergent or a handful of dishwasher soap. No harsh chemicals ever.
8. Don't forget to add a line for the vent. You will find the corresponding thru hull fitting on the port side, near the forward engine room bulkhead. Also, make sure this line goes up as high as the engine room will allow before going back down to the thru hull as you want to have a syphon break in the line. This is important.
8. The factory outlet pipe that goes to the macerator has a baloney slice at the bottom ( an angle sut in the pipe) I think you should do the same in your new outlet pipe. Also I added a sealing plug/inspection deck type plate to mine while the lid was off. I plan on eventually hooking up the factory tank monitor through this fitting. It also gives me the ability to run a garden hose squirt hole down there and wash out the tank a bit.
Also, there is a Tee in the outlet line. One side goes to the macerator, the other to the pumpout. After burning up 2 macerators, I replaced that item with a second vacuum pump identical to the one on the vacuflush side. Works great and can run dry with no damage.
That diamond plate really looks nice.
Good luck with your ongoing project. I hope you can enjoy yours as much as I do mine.
Meanwhile all the guys on the forum enjoy keeping up with your unique project and seeing your progress photos, please keep them coming.
RWS
Posted: Sun Apr 24, 2011 7:49 am
by RWS
PK:
Check out that green hose you are using on your fresh water line. If it's not the right specification it could make your water taste bad.
RWS
Posted: Sun Apr 24, 2011 9:40 am
by pk
RWS: .... a couple of things...? For me it looks like a longer list! Well, I have done it almost the way you described, exept for the glue system. Here I have used something called TEC-7. A really strong bonding system, made for bonding between aluminium and glass. I put on a 1/2 inch thick stripe around the lid edge, and I have also used flush head screws every 5". The batteries will be placed where the Genset was, in aft of the head tank. There is a strong support over the bilge well, and I will place the batteries there. I have also a airvent from the tank, running on the front bulkhead and up to the venthole in side. I have also put on a active carbon filter to prevent the odor..... But I have no head tank gauge. I figured out anoter instrument and wiring to keep in order....no. I skipped it. I will run the pump lets say once a forteen day. Actually; I´m not at the boat for sitting on the bowl. I can do that home....

About the green hose..... It was put there by the earlier owner. It will be replaced with a suitable hose, made for drinking water. I will also change all the waterhises and pipes, just in case....
But THANK YOU RWS!! Lot of good advices her!
Posted: Sun Apr 24, 2011 9:56 am
by pk
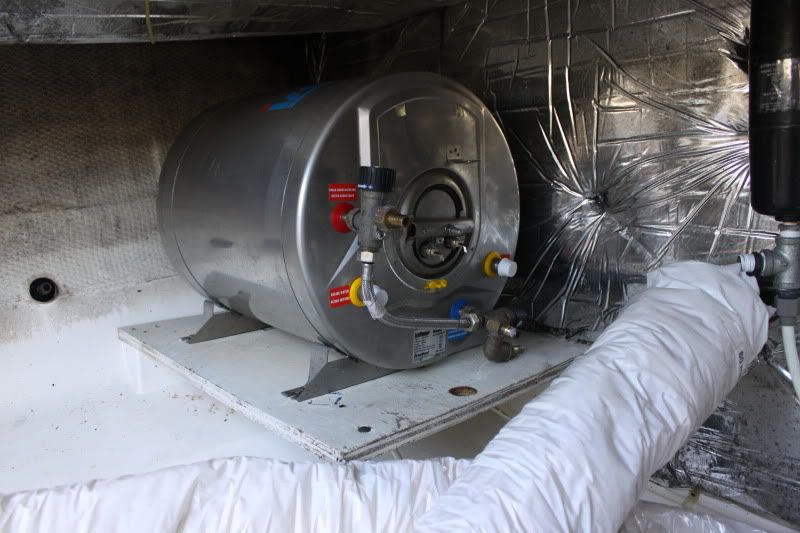
Hotwater tank. It is on 30 liter / 8 Gal. and use about 20 minuts to heat up water for shower or dishwash. Works on engines cooling system, 12 Volt or 220 Volt.
Posted: Sun Apr 24, 2011 10:03 am
by pk
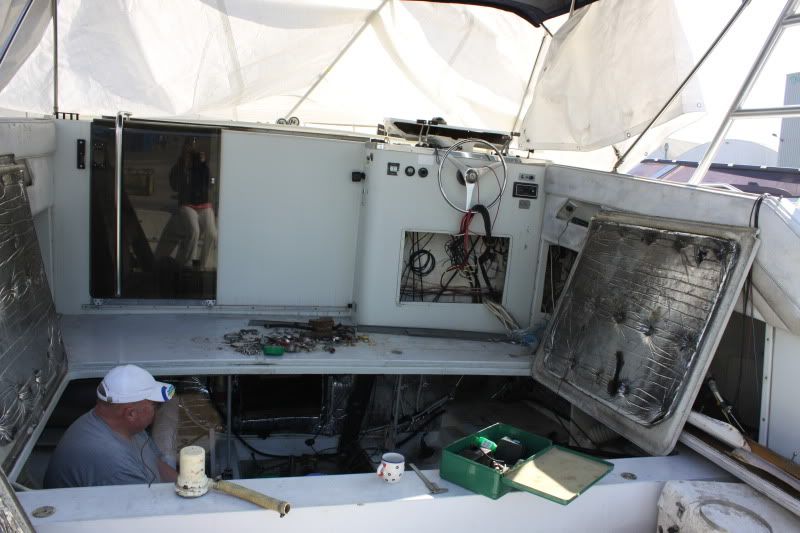
Me resting in the engine room. Life aboard a boat isn´t only work, it is a lot of resting also. The missing windscreen will be mounted on firstcoming week-end. (I hope!!) At last I have got a canvas guy to make me a nice camper canvas. The only thing I have to do is make a new support from the aft of my radar arc.
Posted: Sun Apr 24, 2011 5:59 pm
by foofer b
pk wrote:
Hotwater tank. ..... Works on engines cooling system, 12 Volt or 220 Volt.
now that is cooking with gas- don't need genny or shore power!!
Posted: Wed Apr 27, 2011 5:19 pm
by pk
Hi! Today here will be no pictures. But I have got my new toilet. A brand new vacum toilet. And I have got a new ancor, several new pumps, 25 feet of hoses for toilet, a lot of parts for use in the LPG system, and a lot more. I felt like a kid on Christmas morning, eager to open all the stuff..... And tonite the new carbon sheet arrived. I´m gonna use it on the new instrument panel. Tomorrow there will arrive another packet, this time from Carling Switches. 24 brand new switches, with lights in, and sign for all things. And they are waterproof.... Today was like Christmas, and tomorrow will be the same.

By the way; I´ll get my new propeller shafts back tomorrow. I´ve got a workshop here in city to make me splines in the gearbox end, just for fun....... No, I will try to use an yoke from a light truck, just to see if it works.
Posted: Wed Apr 27, 2011 6:42 pm
by RWS
Sounds like you are having fun, PK !
On the LP gas, there are numerous issues to be aware of regarding the tank and lines, please be careful as that "gas" is heavier than air and will collect where it can easil;y go BOOM !
I really like the factory system of the 2 main breakers followed by all the assorted smaller toggle breakers on the 12 volt side of the main distribution panel.
Also if there is siomething left of the factory wiring, you'll see that every wire has a number tag on it that corresponds to the factory schematic.
Hopefully you are only having to replace the dash wiring.
An old salt showed me a trick where when doing a crimp he dips the bare wires in RTV silicone before crimping the eire end. Up until then I ALWAYS used heat shrink on every connection, however this seems to work really well and to date I see no corrosion at any of the connections he did.
(I still use heat shrink myself, but the other method seems worth while where the wire is at least protected somewhat like under the dash.
Are you going to keep the high water alarm feature ?
RWS
Posted: Wed Apr 27, 2011 7:14 pm
by prowlersfish
pk wrote: By the way; I´ll get my new propeller shafts back tomorrow. I´ve got a workshop here in city to make me splines in the gearbox end, just for fun....... No, I will try to use an yoke from a light truck, just to see if it works.
why would you use splines ?
Posted: Wed Apr 27, 2011 7:24 pm
by pk
Yes, you are right. I have fun with the Trojan. Everything is "falling in right places", sort of say.
I will put the LPG tank in the port side aft corner. There is a drain hole down at the deck, and I will lead the exessive LPG out there. From the LPG tank I will use "unbroken" copperline to the fridge and stove, where I will use marine connectors. I will also use 5 "sniffers" in the lowest places, like the well under the salon, engineroom, under battery bank, and under the fueltank. All sniffers are connected to a alarm system with a beeper and a warning light. I think it should be safe enough.
I will use two mainboard in my 12V system, one for each side (port and starboard). The mainboard have each 25 breakers for all equipment, and ten more breakers for auxillary use. It may happen I want a flatscreen telly, or some other fun stuff, driven by 12Volt.... There will be two main leads from batteries till the mainboards. When I do it this way, I can minimize the amount of wires and electric harness. Less to worry about.
I will put each open end wire into a rubber solution before I crimt the connector on. After two-three minutes it´s dried, and ready for use. I use the same stuff aboard my plane, and also on the five other airplane we have in the aeroclub here. The stuff is red, black, blue or green.
The high water alarm is destroyed. Or better: It did´nt work when I got the boat. I will put in another type, an electronic device same as they use for automatic start of bilge pumps. I will connect it to a cell phone activator that will activate my mobile phone. Or house phone. Or wherever I want to connect it. Nice...? I will put out pictures from everything little by little.
Posted: Wed Apr 27, 2011 7:30 pm
by pk
prowlersfish wrote:pk wrote: By the way; I´ll get my new propeller shafts back tomorrow. I´ve got a workshop here in city to make me splines in the gearbox end, just for fun....... No, I will try to use an yoke from a light truck, just to see if it works.
why would you use splines ?
Good question....

Actually I´m not sure. But there is space enough down there, and to avoid any chanses of misalligned engines, gearboxes to shaft I figured out yokes and splines will be the best. The propeller shaft on a car is in constant movement up and down, without tearing the gearbox or rear axel into pieces..... Or am I stupid...?