Instructions on how to rebuild a Hynautic K-19 steering cyl
Posted: Sun Mar 09, 2014 7:31 pm
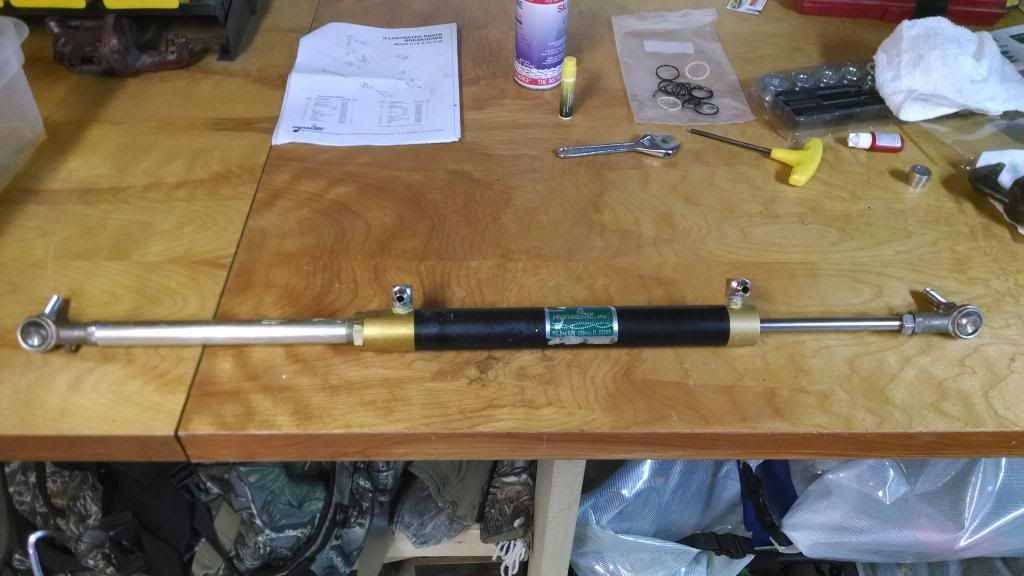
I couldn't find any good info online on how to rebuild a Hynautic Steering Cylinder. I figured it out on my own, took some pictures and thought I'd share with everyone. First of all, its very easy to do once you figure out how to disassemble it. Heres a picture of the rebuilt cylinder
 2014-03-09102307_zpsd46185d2.jpg
The first thing to do is order a Rebuild kit. for the k-19 cylinder the kit you need is Teleflex KS02.

 [
[
First thing you do is un screw the two ball joint ends. then loosen the large lock nut on the side opposite the ram and un screw the aluminum tube. then remove the two allen head drain screws and hose fittings (my ram had been previously drained of oil). its now time to remove the ends.
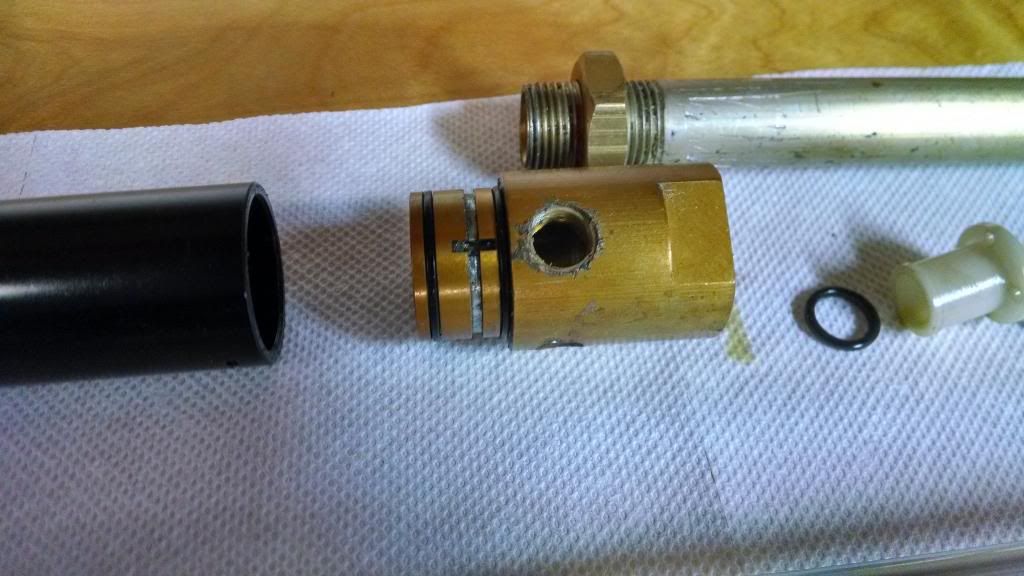
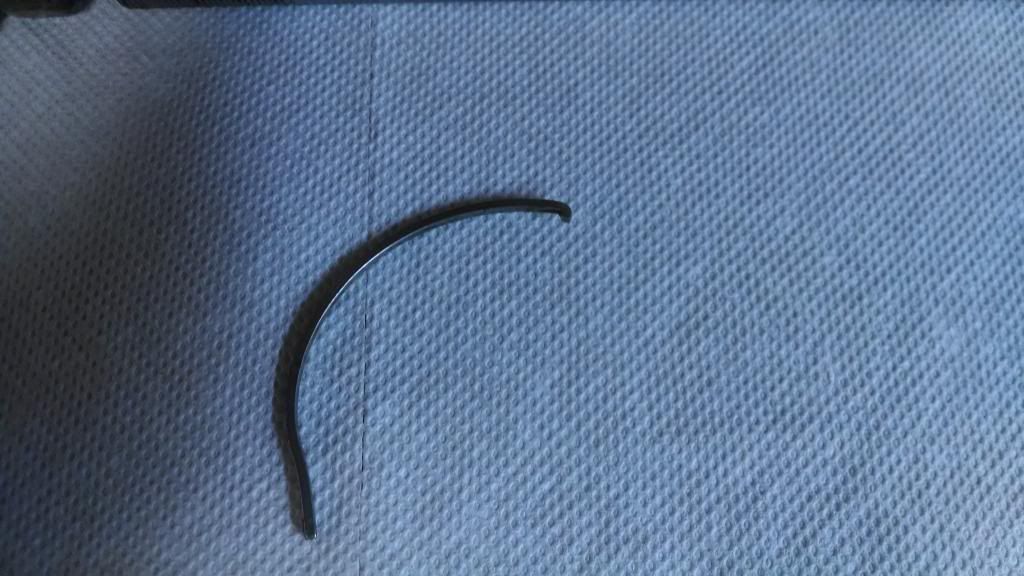
If you look at the picture of the rebuild parts above you will see two metal rods. If you look at the one on the left you can see it has a hook on one end. The hooked end of the rod is inserted into a slit in the cylinder tube. as the the end is rotated while in the cylinder body , it draws this rod into the end cap and wraps it into a groove in the body of the cylinder which locks it in place. here is a picture an end cap, you can see the slot and the groove that its drawn into between the orings.

to take the cylinder apart you are supposed to rotate the end cap in the direction that draws the "hooked wire " around with it. mine did not draw the wire when rotated in either direction. I figured out that the slot in the cap that the hook is supposed to grab lines up with the hydraulic fitting. I had to rotate the end cap while looking through the slit in the tube body. when i saw the curved top of the hook in the slit i took a small screwdriver and a hammer and gave it a smack to slightly bend the hook down into the groove. after I did this, the hook grabbed. when I rotated it it drew the wire with it. I rotated it until I saw the tail end in the slit in the body. I then took a small screwdriver and bent the tail end up through the slit. at this point all you have to do is rotate the end cap in the opposite direction and the wire backs it way out and you have this.

Then This!
 2014-03-09120552_zps4aa59347.jpg
2014-03-07155221_zps5cff1cde.jpg
you then need to remove the retaining from each end cap. the ring has a small notch at the tip. I used a small screwdriver to pry the ring out using the notch then carefully pulled it out. once its out you can remove the white teflon bearing and oring. once apart I cleaned everything in mineral spirits until completely clean. I used a dental pick to help rem ove old thread lock. Inspect for and rust scratches or gouges that may destroy the new seals, mine was good so I got lucky for once! Here is a picture of everything taken apart. a few things to note are that on the "ram" side there is a rubber "wiper" that is inserted in the outside of that sides end cap which is not shown. the ram side end cap will get a new rubber wiper that is inserted on the outside where the ram extends out. on the inside you insert a new oring then the original white bearing which is held in place with a new retaining ring. the end cap that the "arm " threads into gets a new white split washer inside, then a oring and retaining ring. there is no rubber wiper on this cap. the ram gets two new white split washers with a new oring in between.

once the internals are put back in the end caps and new oring on the ram, put two new orings on the outside of each cap. insert the ram back into the body then carefully install the end caps being sure not to damage anything while putting the ram through them. line the hydraulic fitting holes up with the slits in the body. then take one of the new wires, insert it into the slit, hook side down. slowly rotate the end cap so that the wire is pulled inside the body forming a radius in the wire. do this for both sides. screw the extension tube into the end cap and tighten lock nut. screw hydraulic fittings back in. put the last two small plastic washers on the allen bolts and install, screw the ball joint ends on and your done!!!!!
#######################################################################################################################
Note From the Moderator I was able to restore some photos . Sorry they are not in the right order but should help if need to rebuild your k-18 or k-19
##########################################################################################################################
 2014-03-09102307_zpsd46185d2.jpg
 The first thing to do is order a Rebuild kit. for the k-19 cylinder the kit you need is Teleflex KS02.

 [
[First thing you do is un screw the two ball joint ends. then loosen the large lock nut on the side opposite the ram and un screw the aluminum tube. then remove the two allen head drain screws and hose fittings (my ram had been previously drained of oil). its now time to remove the ends.
If you look at the picture of the rebuild parts above you will see two metal rods. If you look at the one on the left you can see it has a hook on one end. The hooked end of the rod is inserted into a slit in the cylinder tube. as the the end is rotated while in the cylinder body , it draws this rod into the end cap and wraps it into a groove in the body of the cylinder which locks it in place. here is a picture an end cap, you can see the slot and the groove that its drawn into between the orings.

to take the cylinder apart you are supposed to rotate the end cap in the direction that draws the "hooked wire " around with it. mine did not draw the wire when rotated in either direction. I figured out that the slot in the cap that the hook is supposed to grab lines up with the hydraulic fitting. I had to rotate the end cap while looking through the slit in the tube body. when i saw the curved top of the hook in the slit i took a small screwdriver and a hammer and gave it a smack to slightly bend the hook down into the groove. after I did this, the hook grabbed. when I rotated it it drew the wire with it. I rotated it until I saw the tail end in the slit in the body. I then took a small screwdriver and bent the tail end up through the slit. at this point all you have to do is rotate the end cap in the opposite direction and the wire backs it way out and you have this.

Then This!
 2014-03-09120552_zps4aa59347.jpg
 2014-03-07155221_zps5cff1cde.jpg
you then need to remove the retaining from each end cap. the ring has a small notch at the tip. I used a small screwdriver to pry the ring out using the notch then carefully pulled it out. once its out you can remove the white teflon bearing and oring. once apart I cleaned everything in mineral spirits until completely clean. I used a dental pick to help rem ove old thread lock. Inspect for and rust scratches or gouges that may destroy the new seals, mine was good so I got lucky for once! Here is a picture of everything taken apart. a few things to note are that on the "ram" side there is a rubber "wiper" that is inserted in the outside of that sides end cap which is not shown. the ram side end cap will get a new rubber wiper that is inserted on the outside where the ram extends out. on the inside you insert a new oring then the original white bearing which is held in place with a new retaining ring. the end cap that the "arm " threads into gets a new white split washer inside, then a oring and retaining ring. there is no rubber wiper on this cap. the ram gets two new white split washers with a new oring in between.

once the internals are put back in the end caps and new oring on the ram, put two new orings on the outside of each cap. insert the ram back into the body then carefully install the end caps being sure not to damage anything while putting the ram through them. line the hydraulic fitting holes up with the slits in the body. then take one of the new wires, insert it into the slit, hook side down. slowly rotate the end cap so that the wire is pulled inside the body forming a radius in the wire. do this for both sides. screw the extension tube into the end cap and tighten lock nut. screw hydraulic fittings back in. put the last two small plastic washers on the allen bolts and install, screw the ball joint ends on and your done!!!!!
#######################################################################################################################
Note From the Moderator I was able to restore some photos . Sorry they are not in the right order but should help if need to rebuild your k-18 or k-19
##########################################################################################################################